|
|
||||||||||||||||||||||||||||||||||||
|
||||||||||||||||||||||||||||||||||||
|
||||||||||||||||||||||||||||||||||||
|
Step 0: Make sure your Space Invaders game is fully workingBefore installing this kit, make sure your Space Invaders game is fully
functional. This kit can only work in a fully functional game. This kit only
works on the Midway/Bally black and white style of space invaders which has the
L-shaped boardset.
Step 1: Turn off power to the gameWhile it may be possible to install this kit without removing your board from its cabinet, you may find it easier to install the kit if you do remove the board. In that case, pay careful attention (or label), any wire connections as you disconnect your board so that you can correctly reconnect the game boardset afterwards. Take note of which side of the edge connectors are facing the parts side of the board and which sides face the solder side, It is possible the connectors may not me keyed and can be inadvertently plugged in backwards - ouch! It is recommended that you label the connectors face with something like "parts side" or "solder side". Step 2: Remove the L-shaped game boardset from the cabinetFor the upright, the game boardset is usually attached to the right side of the cabinet (as viewed from the back). Refer to your game manual for additional information about locating and removing the game boardset. See also the pictures in step 0. Step 3: On the Motherboard, locate and remove the 8080 CPU chipLocate and remove the 8080 CPU chip on the board. Use the images below to assist in locating it. The 8080 CPU chip is a 40 pin (large) chip, located in Row 2 There are three 40 pin chips in a cluster near the corner of the board. Remove only the 8080 CPU. Use the photos as a guide to help locate the chip. Remove the chip gently by using a flat head screwdriver or an IC remover to pry it out of its socket from each end. Some of the boardsets may have open frame sockets which do not protect the PCB traces. Be careful not to scratch any of the PCB traces underneath the socket. Also be careful not to bend any of the pins. If any pins do get inadvertently bent, you will need to straighten them out before the next step. Needle nose pliers work well for this.
Step 4: Insert the 8080 CPU into the kit daughter cardInsert the just removed 8080 CPU chip into the empty 40 pin socket on the kit daughter card. Make sure pin-1 is correctly oriented. Pin-1 is usually indciated on the 8080 CPU chip by some type of indentation or circle molded into the plastic. Pin-1 on the daughter card is marked by a large "1" on the PCB, as well the with the text "8080". If the 8080 chip is installed backwards it will cause permanent damage to the 8080 chip.
Step 5: Insert the daughter card into the boardInsert the daughter card back into the 8080 CPU socket on the board where the 8080 CPU chip was originally removed from. Again, make sure pin-1 of the 8080/daughter card is oriented to correctly match pin-1 on the board. Use the photos as a guide. The gold machined pins on the daughter can bend very easily, make sure they are all straight and that each pin is inserted in the motherboard socket.
Step 8: Double check your workReview the previous steps double checking that 8080 CPU is properly installed into the daughter card with no bent pins and that it is correctly oriented for pin-1. And that the daughter card is also installed snug into the 8080 CPU socket at Row 2 with pin-1 matched up. REPEAT: If any of these devices are installed backwards it may cause permanent damage to the kit and your board!
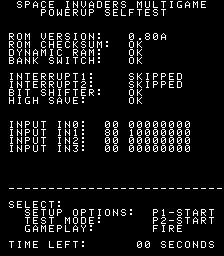
Step 9: Reinstall game boardset into cabinet and Power-upReinstall your Invaders boardset into the cabinet, re-hookup the edge connectors with the original orientation. Then power-up your game. If the game does not come up, turn power off immediately, double check your work. Step 10: Verify Multigame functionalityWhen the game powers up, it first runs a built in self-test and attempts to display the results on the screen. The default behavior when you first install the kit is for the game to remain in boot mode for 10 seconds. You should see a screen that looks similar to this:
Now is a good time to configure your desired game settings via the setup menu. Press p1-start to enter setup mode. Note: The setup menu allows you to configure your boot-up preference. Once in setup mode, verify the settings displayed are the ones desired. To change a setting, use the left and right buttons to move up and down to select the setting to be changed. The selected setting is indicated by an invader icon on the left. Once selected, use the fire button to toggle though the available combinations. When done making changes to settings, be sure to select "SAVE AND EXIT". At this time the game will transition into game play mode. The new settings should now be active. As a side note, if you want, you can also remove the old code eproms/roms. These are located at the edge of the board near the 8080 CPU location. See code eprom pic1. |
|||||||||||||||||||||||||||||||||||
|
|
||||||||||||||||||||||||||||||||||||


 3 options are
available at this point. If no option is selected before the timeout expires the
game will transition into game play mode automatically.
3 options are
available at this point. If no option is selected before the timeout expires the
game will transition into game play mode automatically. 